Use the ribbon
This topic explains how to use the NVivo ribbon, including the options you can access from the File tab, the options available on the Quick Access Toolbar and how to minimize the ribbon to make more space.
Options available on the ribbon vary depending on the NVivo edition you are using. Images in this topic show the NVivo Pro edition.
In this topic
- Ribbon elements
- Interacting with the ribbon
- The ribbon in NVivo editions
- How the ribbon changes when you resize the NVivo window
- Customize the Quick Access Toolbar
- Move the Quick Access Toolbar above or below the ribbon
- Minimize or restore the ribbon
- Find commands on the ribbon
- Right-click to access commands in context
Ribbon elements

1 The File tab provides access to:
-
Project-related commands—for example, open, save and copy projects
-
License activation, the license agreement and software updates
2 The Quick Access Toolbar—this toolbar is always visible and provides quick access to frequently-used commands. By default, the Save, Edit and Undo commands are available in the Quick Access Toolbar. You can customize the Quick Access Toolbar by adding or removing commands. You can also move the Quick Access Toolbar above or below the ribbon.
3 Commands are organized into logical groups, collected together under tabs. Each tab relates to a type of activity, such as creating new project items or analyzing your source materials.
The Home, Create, Data, Analyze, Query, Explore, Layout, and View tabs are always visible. The other tabs are 'contextual'—they are shown only when needed. For example, the Picture tab is shown only when a picture content is visible.
4 Within each tab, related commands are grouped together. For example, the Format group on the Home tab contains commands for setting font size, type, bold, italics and underline.
NOTE: The options you see on the ribbon vary depending on which NVivo edition you are using.
Interacting with the ribbon

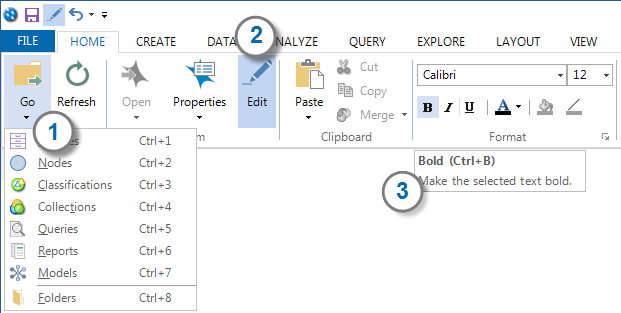
1 An arrow below or beside an icon indicates that there is a drop-down menu containing more commands, when you click on the icon the drop-down menu is displayed.
2 Orange highlighting indicates that an option or command is selected. In the example above, the orange highlighting indicates that the item displayed in Detail View is in edit mode—if you click the Edit icon, you will turn OFF Edit Mode.
3 When you hover over a ribbon command, a screen tip appears which provides a brief description of the command.
The ribbon in NVivo editions
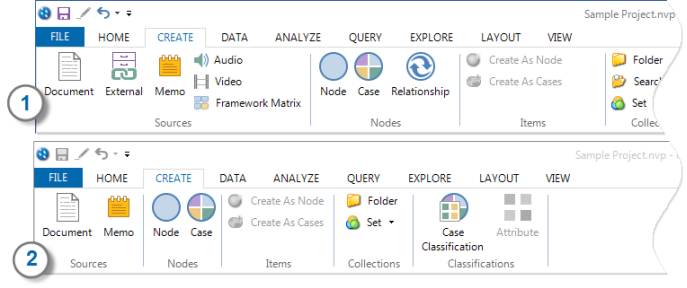
The options that are available on the ribbon vary depending on the NVivo edition you are using.

1 Example of the Create tab on the ribbon of NVivo Pro edition.
2 Example of the Create tab on the ribbon of NVivo Starter edition.
How the ribbon changes when you resize the NVivo window
The ribbon is optimized for a screen resolution of 1280 by 1024 pixels, when the NVivo window is maximized on your screen.
When the NVivo window is not maximized, the ribbon resizes accordingly. If you want to see all the icons and text on the ribbon, you should resize or maximize the NVivo window.
Customize the Quick Access Toolbar
By default, the Save, Undo and Edit commands are available in the Quick Access Toolbar. You can customize the toolbar by adding, removing or reordering commands to suit the way you work.
To add (or remove) commands on the Quick Access Toolbar:
- On the Quick Access Toolbar,
click Customize Quick Access Toolbar
 .
. - In the list, click More Commands (if you want to add a common command like New, Open or Print—just select it from the list).
The Quick Access Toolbar Customization dialog box opens.
- In the Choose commands from list, select an option to narrow the set of commands— for example, you can filter the list to see all the commands on a particular ribbon tab (like the Home tab) or to see the popular commands across all tabs.
- Select a command from the list on the left and click the Add button.
NOTE
-
To remove a command from the toolbar, select it from the list on the right, and click the Remove button.
-
To change the order of commands on the toolbar, select a command from the list on the right, and click the up or down arrow.
-
To return the toolbar back to its default settings, click the Reset Defaults button.
Move the Quick Access Toolbar above or below the ribbon
The Quick Access Toolbar can be positioned above or below the ribbon.
- On the Quick Access Toolbar,
click Customize Quick Access Toolbar
 .
. - In the list, click Show Below the Ribbon or Show Above the Ribbon.
Minimize or restore the ribbon
You can minimize the ribbon to free up space in your screen.
-
On the Quick Access Toolbar, click Customize Quick Access Toolbar
 , and then click Minimize the Ribbon.
Keyboard Shortcut To minimize or maximize the ribbon, double-click one of the tabs at the top of the ribbon.
NOTE When the ribbon is minimized, the tab titles remain visible, so you can access ribbon commands—click the tab title to display the tab, and then click the option or command you want to use.
Find commands on the ribbon
You can use the ribbon screen tips to help find a command—screen tips contain a brief description of the commands available on each icon. Screen tips are displayed when you hover over the icon.
Right-click to access commands in context
Shortcut (right-click) menus are available throughout the application. You can access the most frequently-used commands via the shortcut menus.
For example, if you right-click a document source in List View, the shortcut menu is displayed, providing access to many ribbon commands, including Open, Print, Export, Copy and Code Sources.


