

Automatic coding in dataset sources
This feature is available in NVivo Pro and Plus editions. Learn more
You can use auto coding to organize dataset content into case nodes or theme nodes for further exploration. This topic explains how auto coding works in different types of datasets and explains how to get started with the Auto Code Wizard.
What do you want to do?
- Understand automatic coding in datasets
- Auto code a dataset at nodes for selected columns
- Auto code a dataset at nodes for each value in a column
- Auto code a social media dataset based on predefined columns
- Auto code a dataset based on existing coding patterns
Understand automatic coding in datasets
A dataset contains structured data arranged in records (rows) and fields (columns). Datasets can contain classifying columns and codable columns. You can use the Auto Code Wizard to code content of codable columns.
You can auto code a dataset based on:
-
Structure
-
Existing coding patterns
-
Themes or sentiment (NVivo Plus only)
Auto code a dataset based on structure
NOTE: NVivo 11 (Update 2) introduced the Survey Import Wizard which automatically creates and classifies cases; and codes survey responses to nodes. Refer to About survey and dataset sources for more information.
You can auto code based on the rows or columns in your dataset. You can choose to:
-
Code at nodes for selected columns
For example, If you have imported survey results from a spreadsheet or directly from SurveyMonkey, you can auto code to gather all the responses for each question.
The image below shows a dataset containing survey responses to two questions. With auto coding, you can create a node (Q1 and Q2) for each question. The responses to each question are automatically coded at the relevant node.
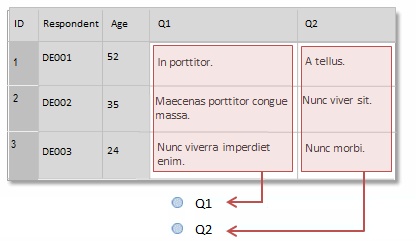
Refer to Auto code a dataset at nodes for selected columns for detailed instructions.
-
Code at nodes for each value in a column
For example, if your dataset contains survey results, you can auto code to gather everything a particular respondent has said.
In the image below, a case node is created for each respondent (DE001, DE002, and DE003) and the responses are coded at the relevant case.
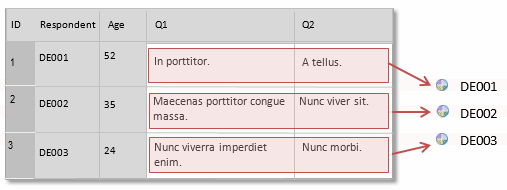
If you have collected demographic information about the survey respondents, you could auto code based on the values in other classifying columns—for example Gender or Age. You can also group the responses together to create and code at a node for each demographic group—for example Age 21-30, Age 31-40 and so on.
Refer to Auto code a dataset at nodes for each value in a column for detailed instructions.
-
Code at nodes for each value in predefined columns (social media datasets only)
For social media data collected with NCapture—for example from Facebook or Twitter—you can choose to code at nodes for each value in predefined columns.
For example, you might auto code to theme nodes based on hashtag, or case nodes based on username.
The image below shows an example of a dataset containing Twitter data. You can auto code to gather Tweets from predefined columns—for example hashtag. A theme node is created for each hashtag (hashtag1 and hashtag2) and the relevant content is coded at the node.
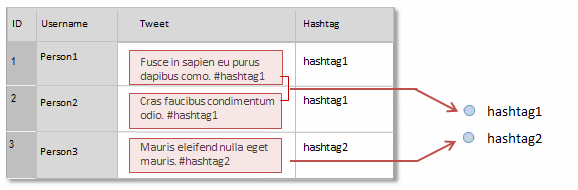
Refer to Auto code a social media dataset based on predefined columns for detailed instructions.
Auto code a dataset based on existing coding patterns
This feature is available in NVivo Plus.
You can choose to code your dataset using existing coding patterns.
When you auto code using existing patterns, NVivo compares each text passage—for example, sentence or paragraph—to the content already coded to existing nodes. If the content of the text passage is similar in wording to content already coded to a node, then the text passage will be coded to that node.
Refer to Auto code a dataset based on existing coding patterns for more information.
Auto code a dataset based on themes or sentiment
This feature is available in NVivo Plus.
Identify themes or sentiment in a dataset, and code sentences or entire dataset cells to theme or sentiment nodes. Refer to About automated insights for more information.

Auto code a dataset at nodes for selected columns
-
In List View or Detail View, click on the dataset you want to auto code.
-
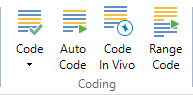
On the Analyze tab, in the Coding group, click Auto Code.
The Auto Code Wizard opens. Follow the steps on the Wizard.
| Wizard step | Description |
|
Choose how you would like to auto code your sources |
Click Use the source style or structure. |
|
Choose how you would like to code at nodes |
Choose Code at nodes for selected columns to create and code at nodes based on the columns in the dataset. For example, you can create a node for all Question 1 responses, and another node for all Question 2 responses. |
|
Choose whether to code all rows or filtered rows. |
This step is only displayed if a filter is applied to the dataset—choose whether you want to use all rows when auto coding, or only filtered rows. |
|
Select the columns you want to create as nodes. |
Select the columns that you want to create nodes for. All the codable columns are selected by default. You can remove a column—click a column in the Selected columns list and then click the left arrow < to move it to the Available columns list. The preview area at the bottom of the wizard shows the nodes that will be created based on the options you have selected (you can choose a location for the nodes in the next step). |
|
Select a location for the nodes. |
You can store the nodes under a parent node or in a folder. If you want to code at nodes that already exist in your project, you must select the location that matches the existing hierarchy. If you select a different location, new nodes will be created. Decide whether you want to turn on aggregation for parent nodes—if you select this option, then all the content coded at the children is shown in the parent node. Refer to Aggregate nodes for more information. The preview area at the bottom of the wizard shows the node structures that will be created, and the content that will be coded to the leaf nodes in the hierarchy. |
Auto code a dataset at nodes for each value in a column
To auto code a dataset at theme or case nodes for each value in a column:
-
In List View or Detail View, click on the dataset you want to auto code.
-
On the Analyze tab, in the Coding group, click Auto Code.
The Auto Code Wizard opens. Follow the steps on the Wizard.
| Wizard step | Description |
|
Choose how you would like to auto code your sources |
Click Use the source style or structure. |
|
Choose how you would like to code at nodes |
Choose Code at nodes for each value in a column to create and code at nodes based on the values in the columns of the dataset. For example, you could create and code at a case node for each respondent in your survey. |
|
Choose whether to code all rows or filtered rows. |
This step is only displayed if a filter is applied to the dataset—choose whether you want to use all rows when auto coding, or only filtered rows. |
|
Select the columns that contain values you want to use as node names |
Select the column that contains the names of your nodes—these are the nodes that will contain the coded content.
(Optional) Choose whether the nodes should be nested into a hierarchy. For example, if you surveyed high school students in three schools, you might create a node structure that has a parent case node for each school and child case nodes for each student. You can select classifying columns which contain the values you want to use to build the hierarchy. Click the Filter and Group button if you want to further refine the node hierarchy that will be created by:
The preview area at the bottom of the wizard,
shows the nodes that will be created based on the options you
have selected on this step of the wizard. Click the |
|
Select a location for the nodes. |
You can store the nodes under a parent node or in a folder. If you want to code at nodes that already exist in your project, you must select the location that matches the existing hierarchy. If you select a different location, new nodes will be created. Decide whether you want to turn on aggregation for parent nodes—if you select this option, then all the content coded at the children is shown in the parent node. Refer to Aggregate nodes for more information. The preview area at the bottom of the wizard shows the node structures that will be created, and the content that will be coded to the leaf nodes in the hierarchy. Click the |
Auto code a social media dataset based on predefined columns
-
In List View or Detail View, click on the dataset you want to auto code.
-
On the Analyze tab, in the Coding group, click Auto Code.
The Auto Code Wizard opens. Follow the steps on the Wizard.
| Wizard step | Description |
|
Choose how you would like to auto code your sources |
Click Use the source style or structure. |
|
Choose how you would like to code at nodes |
Choose Code at nodes for each value in predefined columns This option is only available for datasets containing social media data (for example, Facebook or Twitter) collected with NCapture. |
|
Choose whether to code all rows or filtered rows. |
This step is only displayed if a filter is applied to the dataset—choose whether you want to use all rows when auto coding, or only filtered rows. |
|
Select the predefined columns that contain values you want to use as node names |
Choose how you want to code the posts or comments. The options available will vary depending on the type of social media data. For example, if you are coding a dataset containing Facebook data, you can select Conversation. The content of a post and its comments will be coded to a node for the conversation. This helps to see the context of the comments. If you auto code by Username, a case node is created for each user and their profile information—for example, Gender and Location—is stored as attribute values on their node. The preview area at the bottom of the wizard,
shows the nodes that will be created based on the options you
have selected on this step of the wizard. Click the |
|
Select a location for the nodes. |
You can store the nodes under a parent node or in a folder. If you want to code at nodes that already exist in your project, you must select the location that matches the existing hierarchy. If you select a different location, new nodes will be created. The preview area at the bottom of the wizard shows the node structures that will be created, and the content that will be coded to the leaf nodes in the hierarchy. Click the |
Auto code a dataset based on existing coding patterns
Pattern-based auto coding is an experimental feature that you can test and try out. This feature is designed to speed up the coding process for large volumes of textual content.
When you auto code using existing patterns, NVivo compares each text passage—for example, sentence or paragraph—to the content already coded to existing nodes. If the content of the text passage is similar in wording to content already coded to a node, then the text passage will be coded to that node.
You can also use pattern-based auto coding in conjunction with the other automatic coding techniques. For example, you could auto code your dataset containing survey responses to create nodes for each question. Then, you could use pattern-based coding to 'code on' from a question node.
Pattern-based auto coding is an experimental feature that may work better for some projects than others. Before you use this feature and for more information, refer to the topic Automatic coding using existing coding patterns.