

About theme nodes
Theme nodes are the themes or topics from your source material. These nodes could be descriptive or analytical. You might already know the topics you are exploring when you begin your research, or you might identify themes that emerge as you code your sources.
You can organize theme nodes in your project using folders, hierarchies and aggregation.
You cannot classify theme nodes with attributes or demographic data. If you want to assign attributes to your nodes you should create cases instead.
In this topic
- What is a theme node?
- Creating nodes for the themes in your source materials
- Organizing nodes into folders
- Creating node hierarchies
- Aggregating nodes (gather all content in the parent node)
- Explore the references in a node
- Explore nodes using charts and other visualizations
- Explore nodes using queries
- How can I use node nicknames?
What is a theme node?
A theme node is a collection of references about a specific theme, topic, concept, idea or experience. You gather references to the theme by 'coding' sources at the node. For example, while exploring your sources (documents, datasets, pictures, video or audio) you could code any content related to 'illegal fishing practices' at the node illegal fishing. Then when you open the node (by double-clicking it in List View) you can see all the references in one place.
Creating nodes for the themes in your source materials
Do you already know which themes or topics you will be exploring? You can create a node structure before you begin coding, and easily add any nodes that emerge as you work through your sources. Refer to Create theme nodes manually for more information about setting up node structures in List View.
If you don't already know what themes might emerge from your project you can work 'up' from your sources, creating nodes as you go. Refer to Create theme nodes manually for more information about creating nodes as you explore your sources, including 'in vivo' coding.
Initially you might create nodes at the top level and then later organize them into hierarchies when connections become apparent. Refer to Creating node hierarchies for more information.
You can also use queries to find and code content that relates to a particular theme at a new node. For example, you could run a Text Search query to find all references to development and automatically code this content at a new node. Refer to Create theme nodes automatically for more information about creating theme nodes from queries.
If you use NVivo Pro or NVivo Plus and you have tightly structured source materials, then you can use NVivo's 'auto coding' features to do 'broad brush coding'. For example, you could gather all responses to a particular interview question at a node. You can then open these nodes and explore what people have said in response to a particular question, 'coding on' to create more nodes as your themes emerge. Refer to Auto coding structured content for more information.
With NVivo Plus, you can automatically identify themes using automated insights. If you are working with large volumes of data, or have limited time, you can quickly identify broad themes in your sources using the Auto Code Wizard. Refer to About automated insights for more information. (NVivo Plus only)

Organizing nodes into folders
Just like sources, you can organize nodes in folders to suit the way you work:
-
Nodes
-
Themes
-
Survey questions and responses
If you are working on a shared project, you might initially use a folder for each team member to code at. When you see what themes are emerging you could choose to merge similar nodes together. Refer to Reorder and refine nodes for more information.
You can also use folders to set the scope of a query—for example, run a Text Search query on all the material in the Interview Participants folder.
Creating node hierarchies
You can organize nodes in hierarchies (parents and children) to organize your material and consolidate your thinking.
For example, you might organize themes nodes (related to water quality) like this:
-
Perceived causes of poor water quality
-
Industrial waste
-
domestic sewage
-
agricultural runoff
If there is no logical connection between your nodes (or perhaps these connections are not yet apparent) you can just add nodes at the top level of the hierarchy.
Another way to create a node hierarchy is to build a mind map first, then automatically create your nodes from the map.
Keeping your nodes organized can help you to see connections, clarify your thinking and code efficiently—for more ideas about creating a manageable node structure, refer to Code sources and manage nodes (Build an efficient node hierarchy).
NOTE Organizing your nodes into hierarchies won't automatically include content coded at the child node in the parent node. To do this, you need to turn on aggregation.
Aggregating nodes (gather all content in the parent node)
When working with nodes in a hierarchy, you can gather all the material in child nodes and roll it up into the parent node. Aggregation is turned off by default.
For example, you could turn on aggregation for the node Economy and gather all the content coded at the child nodes—this can be useful if you want an overall perspective:
-
Economy
-
Agriculture
-
Fishing or aquaculture
-
Jobs and cost of living
-
Tourism
All current coding at Tourism and any future coding or uncoding at Tourism will be reflected in Economy. The number of sources and references for the Economy node will reflect an aggregated total of the number of sources and references from all of its child nodes.
When aggregation is turned off on a parent theme node, the hierarchical structure is a visual representation only.
The ![]() icon in the Aggregate column indicates
that aggregation is turned on. This column is not visible by default—you
can add
the column to your node List View.
icon in the Aggregate column indicates
that aggregation is turned on. This column is not visible by default—you
can add
the column to your node List View.
When you open a node that has aggregation turned on, you can see all content coded at the node and content coded at the direct child nodes.
For more information, refer to Aggregate nodes (gather all content in a parent node).
Explore the references in a node
You can open a node in Detail View to see all the references that have been coded at that node.
You can turn on coding stripes to see the themes that have been coded at the node and 'code on' to other themes or topics. As you read through the references, you might want to record your observations and ideas in a linked memo.
To understand more about working with the content in a node, refer to Review the references in a node.
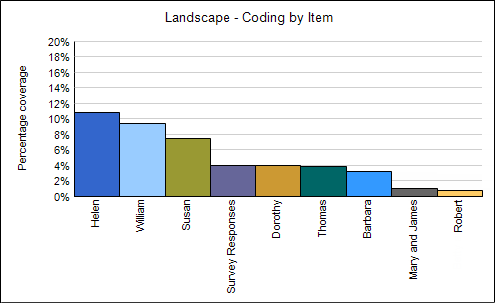
Explore nodes using charts and other visualizations
You can explore your nodes with charts. For example, you could create a chart to see which sources are most or least coded at a node—for example, the node Landscape has more coding references from the source Helen than from any other source.
Refer to About charts for more information.
You could also use:
-
A hierarchy chart to compare the amount of coding at your nodes—do some nodes contain more coding references that others?
-
A cluster analysis diagram to see your nodes grouped by similar words.
-
An explore diagram to see all of the project items connected to a node, and step through your project data to explore the connections between items.
Explore nodes using queries
When you have created nodes and coded content you can use these attributes to gather the data or make comparisons.
For example, you could:
-
Use a Coding query to see where content coded at coral bleaching is near content coded at rising sea temperatures.
-
Use a Matrix coding query to compare how the terms sustainable, conservation and global warming used by different lobby groups. (NVivo Pro and Plus only)
-
Use a Group query to see which interviews have been coded at wind power and solar power. (NVivo Pro and Plus only)
-
Run a Coding query to gather all the material on water quality and create a new node based on the results. Then run a Word Frequency query on this new node to check for commonly used terms.
How can I use node nicknames?
When you create a node (or edit its properties) you can give it a nickname. This nickname can be used as a fast way of coding your source content using the Quick Coding bar.
Refer to Give a node a nickname for more information.